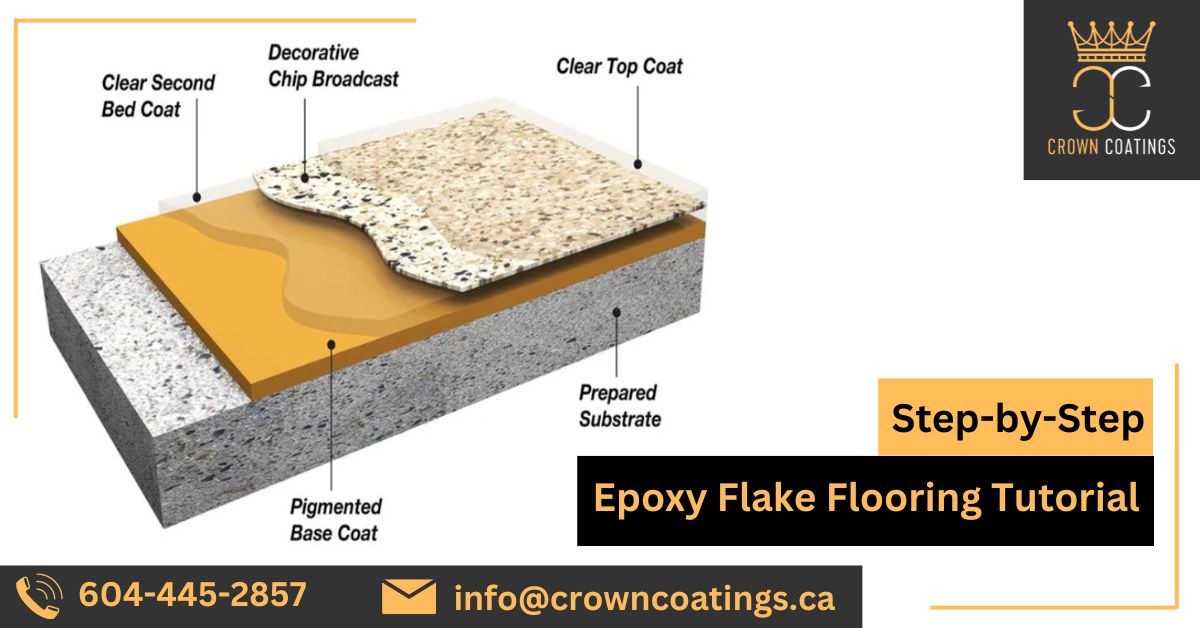
Transform your floor by choosing a durable solution that create a visually stunning and long-lasting surface and your search ends here at epoxy flake flooring. This is perfect for basements, garages and commercial spaces for its aesthetic appeal and resilience. Check out this step-by-step guide to achieve a professional finish with epoxy flake flooring.
Step-by-step guide for Epoxy Flake Flooring
Step 1: Prepare the surface
You should first start with cleaning the floor thoroughly. Remove all kinds of stains, grease and oil using any kind of cleanser. Next, etch the concrete with a concrete etcher for opening up the pores. It ensures better adhesion of epoxy. After that rinse the floor with water and leave it for sometime until it gets dry.
Step 2: Tape and repair
Inspect the floor thoroughly for identifying the cracks or holes and make sure you fill them with concrete repairing compound. Once it gets dried, you must sand them smooth for better ensuring a better finish.
Step 3: Apply the Epoxy primer
Mix the epoxy primer following the instructions of the manufacturer. using a paint roller for applying paint across the floor. This kind of layer enhances the base coat of the epoxy flooring.
Step 4: Apply the epoxy base coat
Make sure to mix the epoxy base coat properly. Pour the mixture on the floor and spread it evenly with the help of a roller. Make sure to work in small sections to maintain a perfect wet edge. While the base coat is wet, you must spread the decorative flakes generously over the surface.
Step 5: Scrape excess flakes
Once the base coat is completely dried. Scrape off excess or loose flakes with the help of a floor scraper. Vacuum the floor for removing all debris and offer a smooth surface on the top coat.
Step 6: Apply the topcoat
Mix the clear top coat and apply it over the decorative flakes using a clean roller. It offers a durable and glossy finish. Keep the topcoat on the floor for near about 48 to 72 hours. After that, you can touch up as per your need to create a stunning epoxy flake flooring.
If you want to get this work done by a professional who can offer a stunning finish to your floor, look no further hire Crown Coatings. They have a trained team of professionals who have the expertise and skills to provide you the best flooring solution.